Can I Use A Paint Brush For Acrylic Nails?

Introduction
Acrylic nails are a popular technique to add a glamorous touch to your outfit. They’re fake nails that are put to your natural nails with a particular liquid and powder. Acrylic nails are long-lasting and come in a variety of colours and shapes. While there are numerous tools and techniques for applying acrylic nails, using a paint brush is an excellent way to create elaborate designs and patterns. In this post, we’ll look at how to utilize a paint brush for acrylic nails and offer some advice on acrylic nail painting techniques.
I. How to use a paint brush for acrylic nails
A. Materials needed:
- Acrylic nail kit
- Paint brush
- Nail polish remover
- Cotton swabs
- Nail file
- Topcoat and basecoat
B. Steps to follow:
Step 1:
To begin, prepare your nails for acrylic application. Remove any existing nail paint and file your nails to the desired shape.
Step 2:
Allow the basecoat to dry completely on your nails.
Step 3:
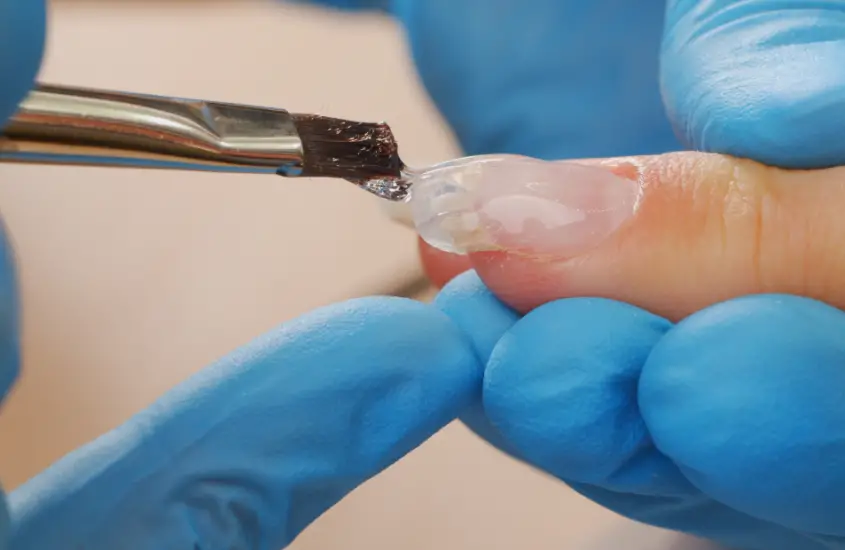
Dip the paintbrush first in the acrylic liquid, then in the acrylic powder. This will result in an acrylic ball on the brush.
Step 4:
Apply the acrylic to your nails with the brush, beginning at the base and working your way to the tip. Make certain that it is applied evenly and smoothly.
Step 5:
Create designs and patterns on the acrylic nails with the brush. You can make stripes, dots, or any other pattern you like.
Step 6:
Allow the acrylic to dry completely before applying the finish. This will provide a glossy finish to your nails while also protecting the artwork.
II. Tips for acrylic nail painting techniques using a paint brush
A. Proper handling of the paint brush:
- Hold the brush like a pencil for better control.
- Keep your hand steady while applying the acrylic.
- Practice on a piece of paper or practice nails
When using a paint brush for acrylic nails, it’s important to hold the brush like a pencil to have better control over the strokes. Keeping your hand steady while applying the acrylic is also crucial to prevent smudging and to ensure even coverage. Practice on a piece of paper or practice nails to get a feel for the brush and to develop your technique. With practice, you’ll be able to create beautiful designs with ease.
B. Choosing the right paint brush:
- Use a fine-tipped brush for intricate designs.
- Use a flat brush for larger areas or simple designs.
- Use a clean brush for each color to prevent colors from mixing.
It is critical to select the proper brush for the job in order to produce the finest results. To maintain precision and control when working on intricate designs, use a fine-tipped brush. A flat brush may be more ideal for broader areas or simpler designs. It’s also vital to use a separate brush for each color to avoid color mixing and obtain rich, accurate hues. You may make amazing graphics that stand out by using the right brush.
C. Cleaning and maintenance:
- Clean the brush after each use by dipping it in acetone or nail polish remover.
- Wipe the brush gently with a cotton swab to remove excess acrylic.
- Store the brush in a clean and dry place to prevent damage.
To guarantee that your brush lasts and retains its quality, clean it thoroughly after each use. To remove extra acrylic, soak the brush in acetone or nail polish remover. Then, using a cotton swab, gently wipe away any leftover residue from the brush. To avoid damage and to ensure that the brush is ready for the next usage, keep it in a clean and dry place. You can extend the life of your brush and continue to create beautiful designs by cleaning and maintaining it properly.
Conclusion
Using a paint brush for acrylic nails at home is an excellent technique to create unique and elaborate designs. Anyone can make salon-worthy acrylic nails by employing the proper techniques and materials. To get the greatest results, choose the suitable brush, handle it properly, and clean it after each use. You can take your acrylic nail game to the next level with these tips and tactics.
In conclusion, this article discussed the usage of a paint brush for acrylic nails, explaining the processes to take and providing recommendations for acrylic nail painting techniques. You may create stunning and distinctive acrylic nails at home by following these recommendations, saving money and expressing your originality.


Comments
Trackbacks & Pingbacks
[…] is critical to maintain control over the thickness of the acrylic product when applying it. Begin by applying a thin layer of acrylic near the cuticle and gradually increasing the thickness […]