Can You Paint Over Acrylic Nails That Are Already Painted?
Painting over artificial nails offers a convenient and creative method for upgrading your manicure without the need to remove the existing acrylics. Whether you’re seeking to change the color, try out a new pattern, or simply freshen up your look, this article will give you with step-by-step directions on how to paint over acrylic nails that are previously painted.
By following the necessary techniques and using the right instruments, you may get a beautiful and long-lasting finish. Not only does painting over acrylic nails save time and effort, but it also allows you to explore other color combinations and release your creativity.
In this article, we’ll cover the necessary stages, provide valuable advice and precautions, and empower you to alter your acrylic nails with a fresh coat of polish. Get ready to enhance your manicure game and experience a stunning nail appearance that fits your particular style. Let’s dive into the technique of painting over acrylic nails and release your inner artist!
I. Can You Paint Over Acrylic Nails?
Yes, you can definitely paint over acrylic nails. Acrylic nails provide a solid foundation that allows for easy color changes. Whether you want to switch to a different shade or add a creative design, repainting acrylic nails is a simple and effective solution.
Benefits of Repainting Acrylic Nails:
1. Saves Time and Effort: Repainting acrylic nails saves you the time and effort of removing the existing nails and starting from scratch. It’s a convenient way to update your manicure without the hassle of a full removal process.
2. Versatility: Repainting acrylic nails offers endless possibilities for experimenting with different nail colors and designs. You have the freedom to change your look as often as you like without committing to a permanent change.
3. Cost-Effective: Repainting acrylic nails is a cost-effective alternative to getting a new set of nails done. Instead of investing in a completely new set, you can simply refresh the color or design of your existing acrylic nails, saving you money in the long run.
By repainting your acrylic nails, you can easily keep up with the latest trends, express your personal style, and enjoy a fresh and updated manicure without the need for extensive nail maintenance. So go ahead and unleash your creativity by exploring the wonderful world of repainting acrylic nails!
II. How to Paint Over Acrylic Nails That Are Already Painted
Step 1: Prepare the Nails
Before you begin repainting your acrylic nails, it’s vital to prepare them correctly. Follow these steps:
1. Remove any existing nail polish: Start by using a nail polish remover or acetone-based solution to completely remove any existing nail polish from your acrylic nails. Ensure that the surface is clean and free of any residue.
2. Gently file the surface of the nails: Use a fine-grit nail file to delicately buff the surface of your acrylic nails. This helps to create a smooth texture and erase any shine, allowing the fresh polish to adhere easier.
Step 2: Cleanse the Nails
Cleaning the nails thoroughly is essential to ensure proper adhesion and longevity of the new polish. Follow these steps:
1. Use a nail cleanser or rubbing alcohol: Moisten a cotton pad or swab with a nail cleanser or rubbing alcohol and wipe it over each nail. This will remove any oils, lotions, or residue that might interfere with the polish application.
2. Ensure the nails are dry before proceeding: After cleansing the nails, make sure they are completely dry before moving on to the next step. This will prevent any moisture from affecting the polish application and drying process.
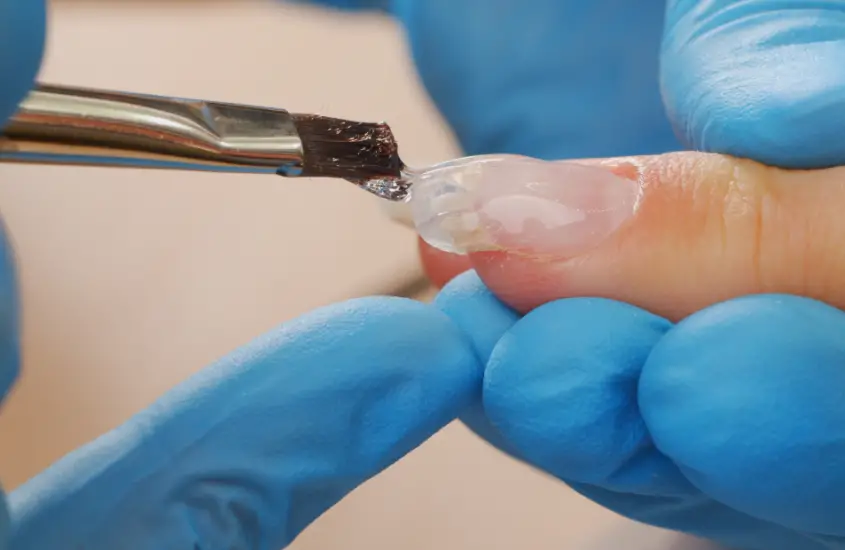
Step 3: Apply a Base Coat
A base coat functions as a protective barrier and helps the polish adhere better to the acrylic nails. Follow these steps:
1. Apply a thin coating of base coat: Using a quality base coat, apply a thin and even layer over each acrylic nail. Make sure to coat the entire nail surface, including the edges. Avoid applying the base layer too heavily, as it may cause to uneven drying and peeling.
2. Allow the base coat to dry completely: Give the base coat adequate time to dry entirely. Follow the instructions provided by the individual brand you’re using, but as a general guideline, allow at least 2-3 minutes for the base coat to dry before going on to the next step.
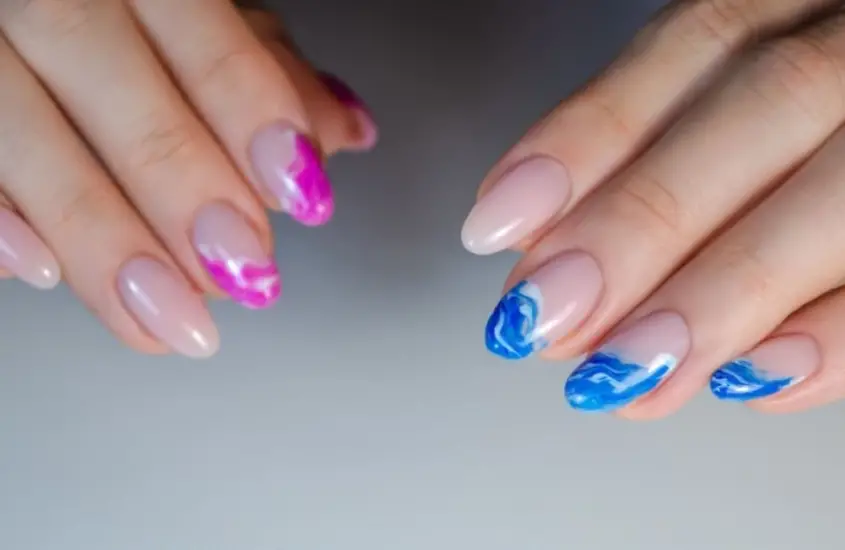
Step 4: Apply the New Nail Polish
Now comes the fun part—applying the new color to your acrylic nails. Here’s what you should do:
1. Choose your desired hue and apply it evenly: Select your desired nail polish color and apply a thin, even layer to each acrylic nail. Start at the base near the cuticle and carefully brush the polish towards the tip of the nail. Be mindful of keeping the polish application tidy and avoiding any surplus near the cuticle or skin.
2. Let the first coat dry before applying a second coat if necessary: Allow the first coat of polish to dry completely. If needed, you can apply a second coat following the same application process. However, make sure each layer is thin to facilitate speedier and more equal drying.
Step 5: Apply a Top Coat
To seal and protect your freshly painted acrylic nails, it’s vital to apply a top coat. Follow these steps:
1. Seal the new polish with a coating of top coat: Using a clear top coat, apply a thin layer over each acrylic nail, covering the entire surface. The top coat helps to add gloss, improve the longevity of the polish, and keep it from chipping.
2. Allow the top coat to dry thoroughly: Give the top coat adequate time to dry entirely. Depending on the individual brand and recipe, this can take anywhere from 5 to 15 minutes. Avoid touching or applying pressure on the nails until the top coat is entirely dry to prevent smudging or denting.
By following these step-by-step instructions, you may efficiently paint over your acrylic nails and obtain a fresh and stunning manicure. Remember to exhibit patience throughout the drying.
III. Tips and Precautions for Painting Over Acrylic Nails
To ensure a successful and long-lasting painted acrylic nail look, consider the following tips and precautions:
1. Use quality nail products:
Invest in high-quality nail polish, base coat, and top coat. Quality products tend to have better formulas, offer smoother application, and provide a more durable finish. This can contribute to a longer-lasting manicure and prevent chipping or peeling.
2. Avoid applying thick layers of polish:
When painting over acrylic nails, it’s important to apply thin layers of polish. Thick layers take longer to dry and are more prone to smudging and wrinkling. Thin coats dry faster and have a better chance of adhering smoothly to the acrylic surface.
3. Properly maintain the painted acrylic nails:
To extend the life of your painted acrylic nails, follow these maintenance tips:
Tip 1: Moisturize the cuticles: Keep your cuticles healthy and hydrated by regularly applying cuticle oil or moisturizer. This helps prevent dryness, cracking, and peeling of the skin around the nails.
Tip 2: Avoid excessive exposure to water: While acrylic nails are generally water-resistant, prolonged exposure to water can weaken the adhesive and cause the polish to lift. When performing tasks such as washing dishes or cleaning, wear protective gloves to safeguard your nails.
Tip 3: Be gentle with your nails: Treat your painted acrylic nails with care. Avoid using them as tools for opening cans or scratching surfaces, as this can chip or damage the polish. It’s also advisable to use a non-acetone nail polish remover when you need to remove the polish, as acetone can be harsh on acrylic nails.
Tip 4: Touch up as needed: Over time, your painted acrylic nails may experience minor chips or wear at the tips. To keep them looking fresh, you can perform small touch-ups by applying a thin layer of polish and top coat to the affected areas.
By following these tips and precautions, you can enhance the longevity and appearance of your painted acrylic nails. Enjoy the freedom to express your style and creativity with a stunning and long-lasting manicure!