Beginner’s Guide to Acrylic Nails
Acrylic nails have become a staple in the world of beauty, offering individuals an opportunity to express their style and creativity through their fingertips. This beginner’s guide aims to demystify the art of acrylic nails, providing essential information and tips for those eager to embark on this nail enhancement journey.
I. Introduction
A. Brief Explanation of Acrylic Nails
Acrylic nails are a type of nail extension created by combining a liquid acrylic product with a powder. This mixture forms a durable and long-lasting layer on the natural nails, providing a canvas for various designs and styles.
B. Popularity and Trend Among Beginners
In recent years, acrylic nails have gained immense popularity, especially among beginners. The versatility they offer in terms of design, length, and color makes them an attractive option for those looking to experiment with their nails.
II. Acrylic Nails vs. Other Nail Extensions
A. Comparison with Gel Nails
When it comes to nail extensions, two popular choices that often stand out are acrylic nails and gel nails. Understanding the differences between the two can help you make an informed decision on the best fit for your style.
Acrylic Nails:
1. Material Composition: Above all, acrylic nails are created using a mixture of liquid monomer and powder polymer. This chemical reaction forms a strong and durable layer on the natural nails.
2. Durability: Known for their robustness, acrylic nails are less prone to chipping and breaking. They can withstand more impact compared to gel nails.
3. Application Process: The application involves the precise mixing of liquid and powder to form a malleable ball that is then shaped onto the natural nail.
4. Flexibility: Acrylics tend to be less flexible than gel nails, which can impact how they feel on the natural nail.
5. Maintenance: Maintenance surely required every two to three weeks to fill in the gap created by natural nail growth.
Gel Nails:
1. Material Composition: Gel nails are made from a gel-like substance that is cured under UV light. The gel is typically applied in layers, requiring curing between each layer.
2. Durability: Gel nails are more flexible and lightweight, providing a natural feel. However, they may be more prone to chipping compared to acrylics.
3. Application Process: Gel nails require UV light for curing, making the application process slightly longer. So, each layer must be cured to ensure proper adhesion.
4. Flexibility: The flexibility of gel nails makes them feel more natural on the nails. They are less rigid than acrylics.
5. Maintenance: Gel nails generally require less maintenance than acrylics and can go longer between fill-ins, typically every three to four weeks.
B. Pros and Cons of Acrylic Nails
Furthermore, let’s explore the advantages and disadvantages of opting for acrylic nails:
Pros:
1. Durability: Strong and resilient, acrylic nails are renowned for being less prone to chipping or breaking.
2. Versatility: They offer a wide range of design possibilities, from simple and elegant to intricate and bold.
3. Affordability: Acrylic nails are often more budget-friendly than other nail extension options, making them accessible to a broader audience.
Cons:
1. Odor: The liquid monomer used in the application process has a distinct odor, which may be off-putting for some individuals.
2. Potential Damage: Improper removal or frequent applications can lead to damage to the natural nail bed.
3. Less Natural Feel: Acrylics can feel heavier and less natural compared to some other nail extension options.
Understanding these aspects can guide you in choosing the nail extension option that aligns with your preferences and lifestyle. Whether you go for the durability of acrylics or the natural feel of gel nails, the world of nail extensions offers a diverse array of choices for expressing your unique style.
III. Getting Started: Materials and Tools
A. Acrylic Powder and Liquid
1. Acrylic Powder: Acrylic powder is a crucial component in the creation of acrylic nails because it comes in various colors and is the foundation for building the nail extension. When selecting acrylic powder, consider the quality and consistency, ensuring it aligns with your desired outcome.
2. Acrylic Liquid (Monomer): Acrylic liquid, also known as monomer, is the catalyst that, when combined with acrylic powder, forms the malleable mixture used to shape the nails. Opt for a high-quality acrylic liquid to achieve a smooth and even application.
B. Essential Tools for Beginners
1. Nail Files:
Invest in a variety of nail files with different grits to shape and refine the acrylic nails. Coarse files can help with bulk removal, while finer files are ideal for shaping and smoothing.
2. Nail Brushes:
Additionally a good-quality nail brush is essential for applying the acrylic mixture to the nails and brushes with synthetic bristles are popular for their precision and ease of use.
3. Dappen Dish:
A dappen dish is a small container used to hold the acrylic liquid during the application process. It allows for easy access and precise control of the liquid-to-powder ratio.
4. Nail Tips and Glue:
For beginners, pre-shaped nail tips can simplify the process. A reliable nail glue ensures secure adhesion of the tips to the natural nails.
5. Cuticle Pusher and Nipper:
Maintaining healthy cuticles is crucial. A cuticle pusher helps gently push back the cuticles, while a nipper can trim any excess skin.
6. UV or LED Lamp:
If you’re incorporating gel products in your acrylic application, a UV or LED lamp is essential for curing and setting the gel layers.
7. Nail Forms:
Nail forms are useful for creating custom shapes and lengths. They provide a guide for shaping the acrylic mixture on the natural nail.
8. Sanitizing Products:
Maintain hygiene during the application process with sanitizing products such as alcohol or sanitizing wipes to clean tools and the work area.
9. Primer and Dehydrator:
Primer and dehydrator products help prepare the natural nail surface, ensuring better adhesion and longevity of the acrylic nails.
10. Nail Buffer:
A buffer is essential for smoothing the surface of the acrylic nails and achieving a polished finish.
11. Nail Polish and Top Coat:
Finish off your acrylic nails with your favorite nail polish or a protective top coat to enhance the overall look and provide durability.
Getting Started Tips:
- Follow product instructions diligently.
- Practice on artificial nails or tips before attempting a full application.
- Keep a well-ventilated workspace to minimize exposure to fumes.
Gathering these materials and tools will set you on the right path for a successful acrylic nail application. Experiment, practice, and enjoy the creative process of enhancing your nails with acrylics!
IV. Step-by-Step Application
A. Preparing Natural Nails
1. Clean and Remove Old Polish: Start by ensuring your natural nails are clean. Remove any existing polish and trim nails to your desired length.
2. Push Back Cuticles: Then gently push back your cuticles using a cuticle pusher. This creates a clean canvas for the acrylic application.
3. Buff the Nail Surface: Use a nail buffer to lightly buff the surface of your nails. This helps remove natural oils, promoting better adhesion of the acrylic.
4. Choose Nail Tips (Optional): If you’re using nail tips, select the appropriate size for each nail. Apply a small amount of nail glue and firmly press the tips onto your natural nails.
5. Trim and Shape Tips (Optional): Last, trim the tips to your desired length and shape using nail clippers and a nail file.
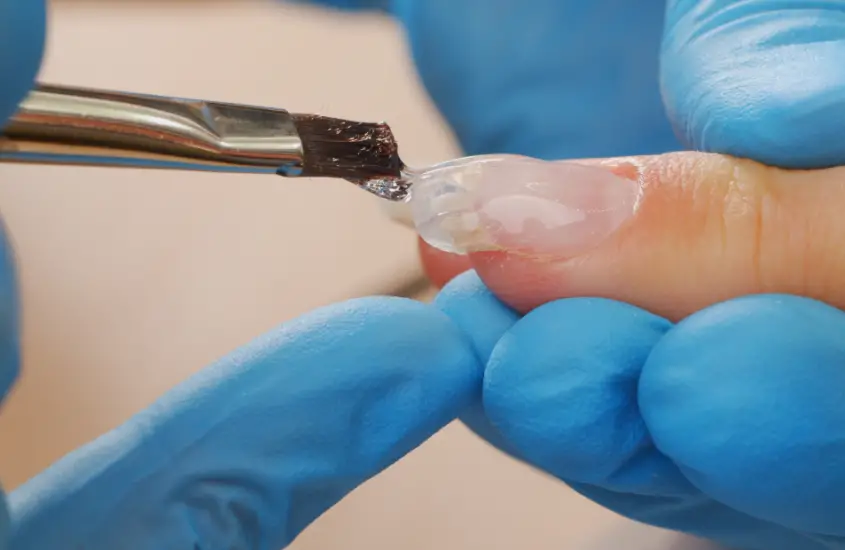
B. Applying the Acrylic Mixture
1. Prepare Acrylic Liquid and Powder: Pour a small amount of acrylic liquid into a dappen dish. Dip your acrylic brush into the liquid, allowing it to absorb.
2. Dip Brush in Acrylic Powder: Then dip the wet brush into the acrylic powder, creating a small bead of the mixture.
3. Apply the Mixture to the Nail: Place the bead at the center of your nail near the cuticle and gently spread it towards the tip. Work quickly but precisely.
4. Smooth and Shape: Use the brush to smooth and shape the acrylic mixture on the nail. Ensure an even application and the desired thickness.
5. Repeat for Each Nail: Repeat the process for each nail, working one at a time to prevent the mixture from drying too quickly.
C. Shaping and Filing Techniques
1. Wait for Partial Cure: Allow the acrylic to partially cure before shaping. It should be firm but not fully set.
2. Shape with a Nail File: Use a nail file to shape the acrylic nails to your preferred length and style. File the sides and tip for a natural look.
3. Smooth the Surface: Use a buffer to smooth the surface of the acrylic nails, removing any rough edges or unevenness.
4. Final Inspection: Last, inspect each nail for uniform thickness and shape. Make any necessary adjustments before the acrylic fully cures.
V. Tips for Long-Lasting Acrylic Nails
A. Proper Maintenance Routine
1. Moisturize Cuticles: Keep your cuticles hydrated by applying cuticle oil regularly. Moisturized cuticles contribute to overall nail health.
2. Avoid Harsh Chemicals: When cleaning or doing household chores, wear gloves to protect your acrylic nails from exposure to harsh chemicals.
B. Dos and Don’ts for Durability
1. Do Schedule Regular Fill-Ins: Above all schedule fill-ins every two to three weeks to maintain the seamless look of your acrylic nails.
2. Don’t Use Acrylics as Tools: Avoid using your acrylic nails as tools for opening containers or performing other tasks that could lead to breakage.
3. Do Protect Nails from Heat: Protect your nails from excessive heat, as prolonged exposure to heat can weaken the acrylic.
4. Don’t Bite or Pick: Resist the urge to bite or pick at your acrylic nails, as this can cause damage and lifting.
5. Do Use a Top Coat: Apply a protective top coat to your acrylic nails to enhance their durability and prevent chipping.
By following these step-by-step instructions and adhering to the maintenance tips, you’ll be well on your way to achieving and preserving stunning, long-lasting acrylic nails. Enjoy flaunting your creative and personalized nail art!
VI. Popular Acrylic Nail Designs for Beginners
A. Simple and Elegant Designs
1. French Tips: Achieve a classic look with French tips. Use neutral colors for a timeless and sophisticated appearance.
2. Single Accent Nail: Keep most nails neutral and choose one accent nail to add a pop of color or a subtle design.
3. Minimalist Lines: Embrace simplicity with minimalist lines or stripes using contrasting colors for a modern touch.
4. Ombre Effect: Blend two complementary colors for a beautiful ombre effect. This design is elegant yet easy to achieve for beginners.
5. Floral Accents: Add delicate flower accents to one or two nails for a touch of nature-inspired elegance.
B. DIY Ideas for Creativity
1. Glitter Gradient: Create a stunning glitter gradient by applying glitter from the tip and fading it towards the base of the nail.
2. Geometric Patterns: Experiment with geometric shapes like triangles or squares using different colors for each shape.
3. Marble Nails: Achieve a marble effect by gently swirling two or more colors together. Each nail can have a unique marble pattern.
4. Watercolor Nails: Use a watercolor technique by blending pastel shades together for a soft and artistic appearance.
5. Negative Space Designs: Incorporate negative space into your designs by leaving areas of the natural nail exposed. This creates a modern and trendy look.
VII. Troubleshooting Common Issues
A. Dealing with Lifting
1. Identify the Cause: Determine the cause of lifting, such as improper nail preparation or product application.
2. Gently Lift Edges: If lifting occurs, gently lift the edges using a cuticle pusher and apply a small amount of acrylic liquid to re-adhere.
3. Prevention Measures: Ensure thorough nail prep, proper application, also avoid getting acrylic on the cuticles to prevent future lifting.
B. Fixing Uneven Application
1. Assess Thickness: Evaluate the thickness of the acrylic on each nail. If uneven, file the thicker areas carefully to achieve a uniform look.
2. Shape Correction: Use a file to reshape the nails if necessary. Pay attention to symmetry and adjust as needed.
3. Apply Additional Layers: If certain areas are too thin, apply an additional layer of acrylic to build up the desired thickness.
4. Smooth with Buffer: Use a buffer to smooth out any rough or uneven surfaces, creating a polished finish.
By experimenting with these designs and being prepared to troubleshoot common issues, beginners can embark on their acrylic nail journey with confidence and creativity. Remember, practice makes perfect, so don’t hesitate to try different techniques and designs to find what suits your style best!
VIII. Removal Process
A. Safe Removal Techniques
1. Gather Supplies: Acetone, cotton balls, aluminum foil, a buffer, and a cuticle pusher.
2. Trim the Acrylic Nails: Use nail clippers to trim the acrylic nails as short as possible without cutting into the natural nail.
3. File the Surface: Gently file the surface of the acrylic nails to remove the top layer and break the seal.
4. Soak in Acetone: Soak cotton balls in acetone, place them on each nail, and wrap the nails with aluminum foil. Leave it on for 15-20 minutes to soften the acrylic.
5. Remove Residue: Use a cuticle pusher to gently push off the softened acrylic. Be cautious not to force or damage the natural nails.
6. Buff and Moisturize: Buff the natural nails to smooth out any remaining residue. Finish by moisturizing your hands and nails.
B. Avoiding Damage to Natural Nails
1. Patience is Key: Avoid rushing the removal process. Patience helps prevent unnecessary pressure on the natural nails.
2. Gentle Techniques: Use gentle movements when filing or pushing off acrylic. Excessive force can lead to damage.
3. Moisturize After Removal: Moisturize your natural nails and cuticles thoroughly after removing acrylic to replenish moisture.
4. Avoid Peeling: Refrain from peeling or picking at any remaining acrylic. This can damage the top layers of the natural nails.
5. Take Breaks Between Applications: If planning to reapply acrylic, allow some time between removal and the next application to let your natural nails recover.
IX. Caring for Acrylic Nails
A. Moisturizing and Protecting Cuticles
1. Cuticle Oil Application: Apply cuticle oil regularly to keep the cuticles and the surrounding skin moisturized.
2. Avoid Harsh Chemicals: Protect your acrylic nails by wearing gloves when using cleaning products or engaging in activities that involve harsh chemicals.
B. Regular Visits for Upkeep
1. Schedule Fill-Ins: Regularly schedule fill-ins every two to three weeks to maintain the appearance of your acrylic nails.
2. Professional Removal: Opt for professional removal at a salon if you’re unsure about the DIY removal process. Professionals can minimize the risk of damage.
3. Assess Overall Nail Health: During salon visits, have a professional assess the overall health of your natural nails and provide any necessary care.
By following safe removal techniques and adopting a caring routine, you can enjoy beautiful acrylic nails without compromising the health of your natural nails. Remember, proper maintenance and attention contribute to the longevity of your acrylic enhancements.
X. Acrylic Nails and Fashion Trends
A. Social Media Influence on Nail Trends
1. Instagram Nail Artists:
- Talented nail artists on Instagram contribute to the popularity of acrylic nail trends. For e.g. their eye-catching designs and tutorials inspire a global audience.
2. Pinterest Boards:
- Pinterest is a hub for nail enthusiasts, with boards dedicated to acrylic nail trends. Users share their creations, fostering a community of creativity and inspiration.
3. TikTok Nail Challenges:
- TikTok’s short-form videos have given rise to various nail challenges, influencing trends and encouraging users to try new acrylic designs.
XI. Acrylic Nails for Special Occasions
A. Wedding Nail Ideas
1. Classic French Manicure: A timeless choice for brides, a classic French manicure with a subtle twist, like a delicate accent nail, adds a touch of elegance.
2. Lace and Pearls: Incorporate lace or pearl accents for a romantic and sophisticated wedding look. These details complement a bridal gown beautifully.
3. Floral Embellishments: Adorn your acrylic nails with tiny floral designs or 3D flower embellishments for a whimsical and garden-inspired aesthetic.
B. Holiday-Themed Acrylic Designs
1. Festive Glitter and Sparkle: Embrace the holiday spirit with acrylic nails adorned in glitter and sparkle. Choose festive colors like red, green, or gold for a cheerful look.
2. Winter Wonderland Scenes: Create a winter wonderland on your nails with snowflakes, snowmen, and icy blue hues. Perfect for the holiday season.
3. New Year’s Eve Glam: Ring in the New Year with glamorous acrylic nails featuring metallic tones, sequins, and a touch of sparkle.
Whether you’re drawing inspiration from celebrities, exploring social media trends, or preparing for a special occasion, acrylic nails offer a versatile and stylish canvas for expressing your unique personality and staying on-trend. Enjoy the journey of discovering and creating beautiful nail art!
XII. Cost Considerations
A. Budget-Friendly Options
1. DIY Kits:
- Explore budget-friendly acrylic nail DIY kits available in drugstores or online. These kits often include the essential products needed for a basic acrylic application at home.
2. Affordable Brands:
- Look for affordable brands of acrylic powder, liquid, and tools. Many beauty supply stores offer cost-effective options without compromising on quality.
3. Pre-Shaped Nails:
- Consider pre-shaped acrylic nails that are ready to apply. These are often more budget-friendly than purchasing separate acrylic powder and liquid.
B. Professional Salon Costs
1. Application Costs:
- The cost of getting acrylic nails done at a salon can vary widely. Basic acrylic applications may be more affordable, while intricate designs or additional services like nail art can increase the overall cost.
2. Location and Salon Reputation:
- Salons in different locations may have varying pricing structures. Established salons with a good reputation may charge higher fees for their expertise.
3. Maintenance and Fill-Ins:
- Factor in the cost of regular maintenance and fill-ins, typically required every two to three weeks. Some salons offer package deals that include multiple visits.
4. Additional Services:
- Extra services such as gel top coats, nail designs, or specialty finishes may incur additional costs. Discuss these options with your nail technician beforehand.
XIII. Addressing Health Concerns
A. Potential Risks and Precautions
1. Allergic Reactions:
- Be aware of potential allergic reactions to acrylic products. Conduct a patch test before full application and seek medical advice if you notice any adverse reactions.
2. Fungal Infections:
- Practice good hygiene to minimize the risk of fungal infections. Avoid moisture trapped between the acrylic and natural nails.
3. Overuse and Damage:
- Overusing acrylics or improper removal can lead to damage, including thinning of natural nails. Follow recommended timelines for removal and give your natural nails time to recover.
B. Choosing Quality Products
1. Research Brands:
- Firstly, research and choose reputable brands for acrylic products. Quality products contribute to a safer and healthier nail enhancement experience.
2. Read Reviews:
- Accordingly read reviews from other users to get insights into the performance and safety of specific acrylic products. Look for feedback on potential allergic reactions or damage.
3. Consult Professionals:
- Seek advice from professional nail technicians or beauty experts when choosing acrylic products. They can provide recommendations based on your specific needs.
XIV. Community and Resources
A. Online Forums and Communities
1. Reddit Nail Communities:
- Above all, join Reddit communities like r/RedditLaqueristas for a platform where individuals share experiences, seek advice, and discuss all things nails, including acrylics.
2. Beauty Forums:
- Also explore beauty forums like BeautyTalk on Sephora or MakeupAlley, where users often share their nail care routines, product recommendations, and troubleshooting tips.
B. Recommended Tutorials for Beginners
1. YouTube Nail Channels:
- Follow reputable YouTube channels dedicated to nails, such as Simply Nailogical or Naio Nails, for step-by-step tutorials and valuable tips for beginners.
2. Online Courses:
- Consider enrolling in online courses that provide comprehensive guidance on acrylic nail application. Many platforms offer courses suitable for beginners.
Navigating the world of acrylic nails involves not only cost considerations but also a focus on health, product quality, and community support. By making informed choices and connecting with resources, beginners can enjoy a positive and enriching experience with acrylic nail enhancements.
Conclusion
Finally, in our exploration of acrylic nails, we’ve covered budget-friendly options, salon considerations, health precautions, and valuable community resources. From DIY kits to professional applications, understanding costs and maintaining nail health are crucial.
All in all embarking on the journey of acrylic nails is not just about aesthetics; it’s an opportunity for self-expression and creativity. Embrace the diverse world of nail art, learn from online communities, and don’t shy away from experimenting with designs. Your acrylic adventure awaits—explore, create, and enjoy the beautiful canvas that is your nails!